Pages

Monday, December 27, 2010

Mediterranean Tomato Soup

It seems to throw everything in the face of tradition, but, I'll admit that I do not like Campbell's Cream of Tomato soup.... way too sweet and creamy for my liking.  If I have to eat it, I definitely have to make it with water, not milk. 

The perfect Tomato soup is tangy, garlicky, a bit of spice and YUM!  My favorite Tomato soup of all time is at the Andaluca (Spanish/Mediterranean) restaurant in Seattle's Mayflower Park Hotel. Theirs is thickened with a great potato bread that they make on the premises, and gosh, every time I want soup at home, I am fresh out of that bread! It also has a spicy tangy flavor that I just couldn't place (besides tomato...duh!) Reading recipes one day, I happened upon a soup that included roasted red and yellow bell peppers.  Eureka, that was the flavor that I was needing to make my soup more to my liking! The soup I invented that day is really SO EASY, it's hard to take full credit for this.  It's so easy to make anytime with ingredients that you probably have in your pantry!

1 med chopped onion
2 Tbsp olive oil
2 tsp garlic, chopped
1 tsp smoked paprika (Optional- adds a subtle smoky flavor)
Salt and pepper as needed as needed
1- 28oz can of Italian plum tomatoes with basil
1- 12oz jar of fire roasted red peppers with garlic
          (Trader Joe's brand or Mezzetta)
2-4 cups of broth (chicken or vegetable)
Cream, if you want to drizzle some of top for serving!

In a medium size stock pot (4-6 qt), Saute onions and garlic in olive oil until translucent and golden brown.

Add to a blender, top with a full jar of roasted peppers (including their liquid), also add the full can of tomatoes. 

Blend until it's smooth.... which actually takes longer than you'd expect, especially if you prefer super smooth soup. 

Add the blended mixture back to the stockpot and turn up the heat to medium high.  I usually use the broth to swish the remains of the blended mixture out of the blender and add to the stock pot. 

Add the broth until the soup is at your desired thickness.  Adjust seasoning to your liking. Heat and serve with bread, crackers, or the all time best pairing for soup and sandwiches, the grilled cheeseTRICK-  Make the sandwich as usual with your preference of cheese, butter the outside of the bread, then press the sandwich into grated Parmesan cheese… grill as usual!  The ‘outside’ cheese makes a delightful crust of cheese, while the inside cheese remains soft and gooey.  Heaven!


Wednesday, December 15, 2010

Easy Microwave Peanut Brittle


Makes about 2 cups, broken into bits
Ingredients

1 c. sugar
½ c. light corn syrup
1 c. dry roasted peanuts
1/8 tsp. Salt
1 tsp. Butter, or margarine
1 tsp. Vanilla
1 tsp. Baking soda


In a 1½ qt. Microwave safe bowl, stir together the sugar and corn syrup. I like to use a 4 cup pyrex container with a handle... because this gets scary HOT and believe me, you're going to want a handle!


Get the peanuts, salt, vanilla and baking soda ready to go because you really need to be able to get your hands on the premeasured ingredients PRONTO!


Microwave the sugar and corn syrup for about 5 minutes, stirring twice.  It will just be starting to get some carmel color at the end of 5 minutes.  Add the peanuts, butter and the salt, mix it well and return to the microwave for another 1 1/2 minute.  Stir it, it might look like it's getting ready to burn.... you want it to get close, but NOT to burn! 


Add the vanilla to the soda and then add to the hot syrup & peanut mixture.  It will start to look foamy... this is good, but acting quickly, spread it out onto the lightly greased pan.  Try not to spread it around with any utensil.... just let it be.  Sometimes I lightly smack the entire pan on the counter to get it to spread out and become flat.  Whatever you do, DO NOT TOUCH IT - - -oh yeah, it is sticky hot and will burn the whole time you are trying to get yourself unstuck from this molten mass!!!


Let Brittle cool for 30 minutes and then break into pieces.  Makes about 2 pounds.

*** In case you're wondering, I only photographed those 4 pieces shown at the top of the blog because that's all that was left when I discovered I had taken all the pictures but the one I really wanted... the final product!


Round Two cooking… make more and use it for:

  • Gifts, this is an easy way to bag up a batch of peanut brittle as a thank you, or to include as part of a Holiday sweet treat tray.

What else would this technique work on???

  • Any type of nut... I use dry roasted peanuts mainly because I like them, but I have also made this with cashews, pecans or whole almonds. I've done it with roasted, salted and raw nuts... it always seems to turn out.
  • Without NUTS.... have you ever had See's Candies "Seafoam" candy?  Basically, it's the brittle without the nuts in a thicker format and then dipped in dark, or milk chocolate.

Hearty Sausage* & Lentil Soup

OK, so I had this awesome sausage and lentil soup years ago at a now defunct* Italian restaurant chain called Cucina, Cucina.  It's just about the ugliest soup ever (yep, even beats split pea!).  I experimented at home and came up with something like it that the family enjoyed for years.  Fast forward 10 years later, and somehow I have stopped making the soup.  So, I bought some hot Italian sausage and went to town in the kitchen making the soup again... this time I got curious and did some google searches.  A couple matches came up for copycat recipes for that restaurant chain, but they were, well... complicated, and I wasn't really feeling their recipes were close to what I remembered. So, I simplified my search and found Rachel Ray's recipe for Spicy Hungarian Sausage and Lentil Soup.  MMmmmm, it really struck a cord with me, but again too complicated.  Here is my rendition of all that I read.... it was really, really good soup and mostly healthy too!

1 16oz. bag of lentils, brown or orange
1 lb. bulk sausage, use mild, and Hot only if you like it quite spicy!
2 med carrots, diced
3-4 stalks celery, including inner leaves, diced
1 med onion, diced small
8-10 cups of water, or stock
     (If water, use 1 Tbsp chicken base, or 3 bouillon cubes)
1 can of diced tomatoes... I used Italian style with basil, oregano & garlic, but any will do.
1 tbsp smoked paprika
1 tsp caraway seeds (optional)
1 bunch of kale, shredded finely and sliced into 2 inch pcs (optional, but good and pretty too!)
Salt & pepper to taste

Brown the sausage and break apart with a wooden spoon as it cooks.... fine is nice, but a bit of chunk is nice too! You don't really need to add any additional oil, because as the sausage browns, it will render some fat.  Leaving the sausage in the pan, add the onions, celery and carrots and cook for about 3-5 minutes over medium high heat.  If you see to much fat in the pan, you can try to drain some off, but really, it adds a bunch of flavor and you aren't adding any other fat.....so relax!  Add the lentils, and the water and bring to a boil. Once it boils, reduce the heat to medium and cook for about an hour until the lentils are soft and are starting to break apart.  Add the tomatoes and the spices and continue to simmer for another 30 minutes, add more water as needed, you don't want this too thick!
Shred the kale and put a small amount in the bottom of each bowl and ladle soup on top! OR, you can just add it to the soup, reheat and serve.  Kale holds up pretty well for taste, color and body.
*I'm not really sure about the 'defunct' part, but these restaurants used to be everywhere, and they are no longer anywhere around here.... they might still be one somewhere else!

Side Dish Inspirations

Here are some ideas for serving with this dish:
  • Bread & Salad... not much else needed!
  • Cup of soup and a sandwich
Round Two cooking… make more and use it for:

If you plan it right, you could make a double batch to have enough leftover to make any of the following for another meal.  Here’s some ideas:
  • Freeze half, you've got dinner made for a busy work night if you remember to take it out of the freezer the night before! Better yet... take it out on Sunday night and let it slowly thaw and be ready when YOU need it!
  • Package it up and bring it to a sick friend or someone going through a tough time.
  • Get those little travel cups with the vented lid and portion a bunch up to take in your lunch.  Way better for you, and lots cheaper too! Plus, if you have a job where it's tough to even get away from your desk, this is the way to do it!

What else would this technique work on???

  • Vegetarian or Vegan? You could leave out the sausage and the chicken bouillon base and use just water, or vegetable broth instead. I bet they make a tofu "sausage" that you could use too!
  • White Beans or Black beans would work great too, but they would take a lot longer to cook. Maybe make a "cheater" version and add 3-4 cans of drained canned beans! I bet it would work!

Thursday, December 9, 2010

Split Pea Soup

The other night a bunch of friends and I were tucking into some great sushi and started talking about Split Pea Soup.... now really, I have no idea why these topics are related, but we were all laughing about liking it so much.  Split Pea Soup is one of those things... people either LOVE it, or won't touch it with a ten foot pole... come to think of it, so is Sushi! I don't ever think I've ever used a recipe for Split Pea Soup, but my friend emailed me this morning, and asked me for my recipe.  Hmmmm, I had to think about it, so I set out to make some soup on a cold winter day and documented it out.


This is a very easy soup, but it does have to simmer quite a while, so it;s best to make it when you've got some time and you're puttering about the house. It makes quite a bit, more than enough for 4 dinner servings served with biscuits or cornbread and a "nice green salad". We've got a joke about a nice green salad in our family, I mean really, why would you serve a green salad that wasn't nice? It was just my Mom giving her salesmanship spin to the healthy part of the meal, now I do the same thing to my kids.  But, I digress...


If you have Vegetarians, or Vegans, at your house, just substitute the chicken broth for vegetable broth or just water. Oh, yeah, and of course, skip the chopped ham too!


1 16oz. bag of dried split peas
2-3 carrots, diced
1 large onion, or 2 medium, diced
3-4 stalks of celery, diced (I prefer the 'inside' small ones with the leaves for this)
1 lb of chopped ham
1 32 oz. box of chicken broth
Water, as needed
Salt & Pepper
Chopped Parsley, optional


Dump the dried split peas into your soup pot, add about a quart of water and the 32 oz (1 quart!) of chicken stock. Dice and add the onions, carrots and celery.  Bring this to a boil and then reduce the soup to medium low and simmer.  Check on it every once and a while and add more water as needed.  The dried split peas will start to cook and swell absorbing the liquid. It took me about 2 hours to get this mixture cooked down to a richly textured soup and the peas completely cooked through and starting to breakdown.  Taste the soup and add salt and pepper to your taste. I found I needed to add about 2 tsp. of salt and LOTS of freshly ground pepper.


At this point, if you like your soup smooth, I would add to your blender and process until smooth.  It's a messy affair and has the potential of blowing your blenders top off when you blend hot liquid, so be careful! Better yet, get one of those handy dandy stick immersion blenders and do it right in the pot.  I used my immersion blender to just blend some of the soup and then added the diced ham.  I also added some chopped parsley at the last minute, because personally, I think that split pea soup is about the ugliest thing around... hence the photo of the finished soup at the END of this recipe!!!  But it tastes good, and it's good for you too!

Wednesday, December 8, 2010

Fudge for Dummies

I actually googled "Fudge for Dummies" and the search came back with a more complicated recipe than this one!  That made me laugh, I guess mine is for super dummies...?  Anyway, this is a simple recipe that's easy to make for the holidays, and makes a great gift or hostess gift too! 

I got this recipe from a can of sweetened condensed milk years ago.  It appealed to me just because it was so easy and I usually have that super humongous bag of chocolate chips that Costco sells in my pantry ready to use up.  This recipe doesn't have the issues that many recipes caution you about, like getting a 'sugared' result... which is just that grainy texture that so many people dislike.  I usually add chopped nuts to this because I can just never get too many nuts in things, but I do understand that some people don't like them!

3 c. chocolate chips
1- 14 oz. sweetened condensed milk
Dash of salt
1 ½ tsp of vanilla
1 c. of chopped walnuts or pecans (optional)

Before you start.... and you NEED to do this, believe me!  


Line an 8x8 pan with foil, see my picture but hopefully you can tell it's just once from side to side- - this is so that you can ‘lift’ the fudge out of the pan once its cooled! Otherwise, your fudge is STUCK in there and mangles it to get it out.

In a heavy saucepan over medium heat, pour the sweetened condensed milk in and gently heat it up. 


Add the salt and dump in all the chocolate chips, stir it upand hopefully you will find that the residual heat from the sweetened condensed milk melts your chips quickly.  


The goal is to melt those chips with a minimum of heat, and
if need be, remove your pan from the heat while you stir.  If you overheat it (all you people who cook on HIGH know what I'm talking about) you'll have dull, seized up (hard to stir) chocolate! 


Remove from heat, stir in nuts, if desired, and then beat in vanilla.  Pour immediately into the prepared pan. Cool completely, lift from pan and cut into squares!


Round Two cooking… make more and use it for:
I like to make 3-4 batches (nuts and no-nuts), cut them up and package them in cute plastic containers and keep them in the freezer.  That way, you always have some goodies for unexpected guests, a hostess gift, and christmas cookie platters.

What else would this technique work on???
You could easily use change up this technique with:
  • Substitute half the chocolate chips for butterscotch chips (I saw a Paula Deen recipe like this!) OR, white chocolate, mint chocolate, peanut butter chips.
  • Add 1 cup of nuts (all kinds!)
  • Add dried fruit... raisins, cherries, cranberries, chopped apricots, candied ginger
  • Use a different flavoring, using some liquer like Kahlua or Grand Marnier.... Mmmm!

Wednesday, November 24, 2010

Chicken Tortilla Soup


Love, love, love Mexican food!  It’s my absolute favorite type of “ethnic” food.
I first fell in love with Chicken Tortilla soup when my husband and I were in Sedona, Arizona at a place called Javelina’s.  I had their soup, and loved it so much, I insisted we eat there again the next day.  When we returned home, I was dreaming of this soup and would order it when I saw it on the menu.  I was surprised by the lackluster and boring versions that constantly disappointed me in restaurants. They never measured up to the soup I was craving, so, I invented this soup one day and couldn’t believe how close it was to my memory.  It’s an easy and satisfying soup to make, and eat, that I don’t worry about ordering when I go out for dinner anymore!

1 large chopped onion
1 chopped red or orange bell pepper
1-2 minced jalapeno pepper (optional)
1-2 chipotle peppers in adobo sauce, minced (optional, but recommended)
1-2 Tbsp olive oil
2 qt chicken stock
2-3 cups of chopped cooked chicken
1- 15oz. can diced tomatoes with jalapenos
1- 15oz can white beans, or chili beans
12 small corn tortillas,
     -Half cut up in 1” pieces and IN the soup while cooking
     -Half cut up in strips and fried crisp, set aside for garnish
1 cup frozen corn
1-2 Tbsp lime juice
½ cup chopped cilantro
2 tsp. cumin
1 tsp. oregano
1 tsp. chili powder
Salt and Pepper to taste

Sauté onions and peppers in olive oil until soft.  Add broth and all the other ingredients… simmer until the chopped tortillas have fallen apart and thickened the soup.

Condiments for topping at the table: 
  • Cubes of avocado
  • Shredded pepper jack cheese
  • Fresh chopped Cilantro
  • Chipotle Sour Cream (recipe follows)

  • Strips of fried tortillas, or tortilla chips (See below for some ideas of how I did it!)
  

Chipotle Sour Cream
2-3 chipotle peppers with sauce
1-16oz tub of sour cream
1 tsp. salt
Add the chipotle peppers in the bottom of the blender, add in the sour cream and salt.  Blend until it’s a nice soft peachy color.

Give it a taste test… if you like it hotter, go ahead and add another chipotle pepper. Best to warn others when serving this… as not every likes it spicy and this can really pack a punch.  So easy, we have this on hand in the fridge at most times.  Try this on your eggs, or even on your sandwich instead of mayonnaise!

Side Dish Inspirations

I’m sure you can think of a million things to serve this with, but here are some ideas if you are feeling low on inspiration today. It doesn’t really need much more, I mistakenly served this as a first course when friends were over, they insisted on seconds, and therefore, no one really wanted the main course. This soup is hearty enough to just serve with:
Green Salad
Southwestern cole slaw


Round Two cooking… make more and use it for:

If you plan it right, you could make a double batch to have enough leftovers for another meal, and it’s definitely great to take to work for lunches!


What else would this technique work on???

You could easily use this technique on any kind of leftover chicken, or Turkey! My favorite way is to use a roasted chicken from Costco (or the grocery store) and shred up the chicken and make chicken stock with the leftover bones. My absolute favorite chicken stock is made from the roasted chicken carcass, which gives more flavor as the bones are already “browned”.

Monday, November 22, 2010

Chicken Saltimbocca


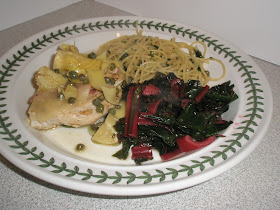
I hear that saltimbocca means "to jump into the mouth", and from the first time I tried this dish at Bucca di Beppo I loved it and wanted it to jump into mine.  It’s so simple but still an elegant and special feeling dinner.  It has so many of the tastes that I love with the salty proscuitto, tangy artichoke hearts and capers.  ***My photo shows it served with sautéed swiss chard and vermincelli con aglio e olio (fancy for 'garlic and olive oil')!

I've read a bunch of recipes online, all claiming to be the same as the restaurant serves, but there are some differences that I noticed. I rarely have fresh sage on hand, so my recipe doesn't call for it, nor have I really noticed the sage when we order in the restaurant. The restaurant version definitely used to include the provolone cheese, but I've noticed they don't serve it that way anymore. I never used to buy provolone but I did for my original version.  I wouldn't make this stuff up... now would I? I 'invented' my version of this dish over 5 years ago and it has been popular with my family for just as long.  I had never written it down before today, but here we go!


4 chicken breasts, pounded to about 1/2 inch.
1 can 15 oz. artichoke hearts, drained
2-3 Tbsp of capers
1/4 cup white wine
2-3 Tbsp of cold butter
4 slices of proscuitto ham
4 slices of provolone cheese
1 lemon, cut into wedges
Parsley, chopped for the garnish
Salt & pepper to taste

Pound each chicken breast to about 1/2 inch in thickness.  Salt & pepper each side and  place into a medium hot pan with olive oil.  Brown on each side, about 2-3 minutes per side, but cooking time will vary with the thickness.

(Whew, sorry about that bad photo, you can tell it was pretty hot and steamy over that chicken! )  Remove the chicken to a serving platter. Add the proscuitto to the pan and quickly brown, about 1 minute each side.  Top each chicken breast with proscuitto and a thin slice of provolone.  Cover the serving platter with loosely tented foil so the heat is retained, and the cheese should melt.  Deglaze the pan by pouring in the 1/4 cup of white wine, stir loosenly all the browned bits leftover from the chicken. Add the drained artichoke hearts and stir to heat through, add the capers and the cold butter stirring constantly. The cold butter will add some body and some creaminess to your sauce, immediately cover your chicken breasts with the sauce covering the melted provolone and proscuitto. Sprinkle with parsley and serve with a wedge of lemon.

Side Dish Inspirations
I’m sure you can think of a million things to serve this with, but here are some ideas if you are feeling low on inspiration today:
  • Plain spaghetti tossed with olive oil and garlic
  • Serve it on a crusty slice of rustic bread to soak up the juices!
  • Steamed broccoli
  • Sautéed spinach
  • French bread

Round Two cooking… make more and use it for:
If you plan it right, you could make a double batch to have enough leftovers to make any of the following for another meal.  Here's some ideas:
  • You could cut up any leftovers and toss with hot pasta and chopped tomatoes for a main dish pasta dinner
  • Very nice for brown bag lunches too!

What else would this technique work on???
You could easily use this technique on:
  • Pork tenderloins medallions
  • Veal
  • Fish, like Salmon or tilapia, but I might skip the cheese... somehow it just doesn't go together.

Tuesday, November 16, 2010

Southwestern Edamame Salad


This is a great salad for any Mexican food, but also works well as something to take to a picnic or a potluck.  I like it because it has so many colorful and healthy vegetables and has some zippy flavors too.  This is such an easy salad to make and stores nicely too.  This is a great salad for your vegetarian (or Vegan) friends and family too!

I usually buy the 8 pack of canned black beans at Costco… they are about half the price of the grocery store, usually about .45 cents a can.  Stock up, you can definitely use these up.
I also buy the 6 pack of bell peppers in red, yellow and orange (I really hate those green ones!).  I have noticed that you do have to make an effort to use the peppers or you will have them spoil.  Plan ahead… use them in salads, spaghetti sauces, stews and even sliced and eaten raw.  NOTE: You may notice that Kidney beans are pictured.... imagine my surprise when I opened the can to make this salad! Whoops! Should have shown Black beans, but either would work!

1 cup of frozen edamame, thawed
1 cup of frozen petite corn, thawed
1 can of black beans, rinsed and drained
1 yellow or orange bell pepper
8-10 small cherry tomatoes
Juice of 1 lime
½ cup chopped fresh cilantro
1 jalapeno, minced after seeds & pith are removed*** optional
1 Tbsp. Cumin
1-2 Tbsp. Olive oil
½ tsp. Salt
Fresh Ground Pepper


Combine all ingredients and toss.  It’s best if you let it sit for 30 minutes or so to meld the flavors! Usually I combine the salad while the corn and edamame is still frozen and let the salad sit and thaw/combine flavors before dinner.  It would also be a great way to transport the salad to a picnic with a built-in “cooler”.


Side Dish Inspirations

Even though this is a side dish already…
  • You could actually make a nice lunch or dinner with it by adding shredded chicken or even shrimp and topping a bed of salad greens with it.
  • You could also add cooled rice, brown or white, which would make a more substantial dish and make a complete protein by combining beans, edamame soy protein and the rice together.


Round Two cooking… make more and use it for:

Make a double batch, put in small lunch size containers for your work week lunch. It keeps very well and is very satisfying too.

What else would this technique work on???

You could easily change up the ingredients to your liking:
  • If you don’t have any edamame on hand, you could use 2 different beans.
  • Jicama is a nice crunchy addition but it doesn’t seem to keep as well for lunches.


Monday, November 15, 2010

Sticky Coconut Chicken

From the first time I made this recipe it was a hit with everyone who had it.  I’ve made some changes, and suggest tweaking the recipe to your tastes. When I make this for young kids, I reduce, or altogether omit the red peppers flakes so it’s not too spicy. If you want an easy make ahead dinner, throw the frozen thighs into a gallon Ziploc bags and make the marinade right into the bag.  The chicken thaws and marinates at the same time.  I’ve also got this ready to go in the Ziploc and brought it to the beach, or even camping! Easy AND yummy.


6-8 boned, skinned chicken thighs (approx 1-1 ½ lbs)
¾ c. canned coconut milk
1 Tbsp. Minced fresh ginger
1 tsp. Fresh ground pepper
1 tsp. red pepper chili flakes
1 Tbsp. Sesame Seeds, toasted
4-5 green onions, sliced on the diagonal

Rinse chicken and pat dry.  In a bowl, or large Ziploc bag, mix coconut milk and spices with chicken.  Marinate 1 hour, or up to 1 day.
Lift chicken from marinade, reserve liquid.  Barbecue thighs over greased grill over high heat, both sides, until cooked through.  Serve drizzled with glaze, green onions and sesame seeds.

Chili Glaze:
¾ c. rice vinegar
½ c. sugar
3-Tbsp. Soy sauce
1 tsp. Chili pepper flakes
Bring to a boil over high heat and cook until mixture is reduced to a ½ cup, about 5-8 minutes.  Stir constantly or it will burn.

Drizzle the glaze over the chicken, and serve the extra for the steamed rice!  Yum!


Side Dish Inspirations

I’m sure you can think of a million things to serve this with, but here are some ideas if you are feeling low on inspiration today:
  • Steamed sticky Rice
  • Yakisoba noodles
  • Cabbage Salad

Round Two cooking… make more and use it for:

If you plan it right, you could make a double batch to have enough leftover to make any of the following for another meal.  You could even slice up the leftovers and freeze them if you wanted!  Here’s some ideas:
  • Chicken Fried Rice
  • Chinese chicken salad
  • Chinese chicken wraps (tortillas, cabbage, chicken, cilantro, shredded veggies, cellophane noodles).

What else would this technique work on???

While I think you can use this technique on chicken breasts or tenderloins, I do think the moist chicken thighs are the best. Try others if you prefer them, or if they are the ones you seem to have on hand!  I have not tried this technique with Pork tenderloin, but I do think it could be very good!  Let me know if you try it.

(adapted from Sunset Magazine June 2001)

Cilantro Chicken


I really can’t get enough cilantro… I adore it. 
I hear that a percentage of people think cilantro tastes like soap, but thankfully, I am not one of those people.   Any kind of Mexican inspired food is always a hit with me, and my family too and I use cilantro like there is no tomorrow.  But, hey, if you don't like, this is probably not the chicken for you.  I suppose you could try this with parsley... I mean, if you really wanted to!  

This really is the perfect recipe for Costco Kirkland Brand frozen chicken breasts, but of course, fresh works too! I usually take out 3-4 frozen chicken breasts and put into a ziploc bag on Sunday nights... that way, the chicken breasts are nicely doing their part towards making meal time easier and thawing during my work week.


4-6 Chicken breasts
¼ cup lime juice
½ cup chopped fresh cilantro
1-2 Tbsp chopped garlic
1 Tbsp. Honey (you can omit this, sometimes I do!)
1 Tbsp. Cumin
1 Tbsp. Olive oil
½ tsp. Salt
Fresh Ground Pepper

Pound* the chicken to an even thickness about ½ inch and place in a ziploc bag or shallow baking pan. In a small bowl, mix all other ingredients and pour over chicken, turning pieces to coat.  Chill and let marinade for at least 30 minutes, but I prefer to let it marinate longer, even if you let it sit overnight.

Lay chicken on medium grill and cook turning once until no longer pink in the center. 4-6 minutes per side.

*You don't have to pound the chicken, but your chicken will take longer to grill and it could cook unevenly.  Being the lazy girl I am, I've done this recipe many times without pounding it, but you do need to watch it to make sure that you don't over cook it, or under cook it!
*When I do pound the chicken, I usually use a ziploc bag to protect it from splattering about.  Just use the ziploc bag that you used to defrost your chicken in... though I gotta tell you, you might not be able to use it again when you marinade it, if you are an especially enthusiastic smacker!

Side Dish Inspirations

I’m sure you can think of a million things to serve this with, but here are some ideas if you are feeling low on inspiration today:
  • Brown rice or Spanish Rice
  • Refried beans with melted cheese 
  • Green salad with black beans, corn and tomatoes… maybe slice that chicken onto the top and make it a main dish salad dinner or lunch.
  • Southwestern Edamame Salad, shown in picture
Round Two cooking… make more and use it for:

If you plan it right, you could make a double batch to have enough leftovers to make any of the following for another meal.  You could even slice up the leftovers and freeze them if you wanted!  Here’s some ideas:
  • Chicken Tortilla Soup
  • Chicken enchiladas
  • Southwestern submarine sandwiches

What else would this technique work on???

You could easily use this technique on any kind of chicken- breasts, tenderloins, thighs, drumsticks… whatever makes you happy, or seems to be the only kind that you have on hand right now! I have even used this on:
  • Frozen tilapia
  • Frozen Salmon
  • Pork tenderloin
  • Beef Flank Steak
  • Beef Tri-tips