Friday, February 25, 2011

Tabouleh


Tabbouleh is my favorite salad, hands down.  My Mom's been making this my whole life... not sure how, or why, she learned to make it, but I'll be eternally grateful.  To me this salad just tastes healthy and yummy and exotic! I've heard it's Lebanese, it's Turkish, it's Greek... really, I don't care- - -I just love it.  I categorized it under "Mediteranean" figuring that covers all the choices.

This is a great salad, or side dish, for parties and picnics.  It covers two important criteria... it's good for vegetarians and it doesn't need refridgeration! I usually serve it with Chicken Souvlaki, which is just a nice word for chicken kebabs.   It's great to make ahead, but don't add the tomatoes until the day you serve it so they don't get weird and watery on you. You can adjust the fresh veggies to suit your taste, I usually add more tomatoes because I like them so much!


Serves approx 4

Ingredients:
1 cup bulger, or cracked wheat
1-1 1/2 cups hot water
1-2 lemons, juiced
1/2 english cucumber, diced or 1 peeled regular cucumber
2-3 medium tomatoes chopped
1/2 bunch of parsley, minced
1 bunch green onions, thin sliced
2-3 Tbsp olive oil, or to taste
Salt & Pepper

First, add 1 cup boiling water over the bulger and let it sit about 1-2 hours.  If the wheat still seems hard, go ahead and add another 1/4 cup of water and let it sit another 30 minutes. Use a large bowl for this!  Even though I show a measuring cup below, the bulger doubles or triples in size!
Chop the veggies and toss into the bulger, add the olive oil and the lemon juice.  Add plenty of fresh cracked pepper and salt to taste.


Bean with Bacon Soup


Snow day today in Seattle, which means I'm not going to post the recipe for a salad that I particularly love. I will save it for a warmer day.... today we need SOUP!

My husband loves Campbell's "Bean with Bacon" soup.... loves, loves, loves it!  It's very darling, especially because he kind of looks like a Campbell's soup kid with his cute smile and his pink cheeks.  Ha ha ha, he will hate that I said that!  But, I believe I will be forgiven knowing how much he loves my Bean with Bacon soup!   I think, after a number of years of making this, I may have perfected it.

This soup is simple and cheap to make; It is so easy and satisfying too!
This recipe makes enough for 6 servings, but the recipe would be easy to double for bigger crowds and should still fit into most 5 qt. crockpots. This soup also freezes well.


Ingredients:

1 1/2 cup dried small white beans
6 cups water, or chicken stock
2 carrots, minced
2 stalks celery, minced
1 med onion,minced
1 15oz. can of diced tomatoes
1/2 lb. bacon, diced
1 Tbsp chicken base, or a couple bouillion cubes if not using chicken stock
Salt & Pepper to taste


Add the dried beans and the water/stock into a crockpot.
Cut up half a pound of bacon into small 1/4" pieces.


***This is lots easier if you throw the whole package into the freezer for 15 minutes before you start!

Fry up the bacon until its starting to cook up and releasing the fat.  Drain the bacon and then add the pieces to the soup. You don't need to cook the bacon until it's crisp, because it's going in the soup for hours, it won't stay crisp anyways.


In a food processor, or by hand, mince the carrots, onions and celery.  


Add to the crockpot.  Add the canned diced tomatoes, including juice. 


***Don't add any seasoning to the soup until later on. Adding salt to cooking beans can make them tough.

Cook for about 6 hours on High in your crockpot.  Test a bean or two to make sure they are tender and cooked through. Add chicken base, salt and pepper as desired.  I also used a potato masher to mash up about 1/4 of the beans to give the soup some body, but it's not necessary if you prefer the beans whole.  This soup could also be cooked longer on a lower setting in your crockpot if you want to cook this while you are at work all day.

Need some regular ideas?  "Like" my Facebook page
 

Monday, February 21, 2011

Salted Caramel Chocolate Shortbread- Millionaire's Shortbread


I lived in Scotland for a while, where they have the most glorious cookie ever- Millionaire's Shortbread.  I think everyone here has heard of shortbread, but those Scottish top it with thick caramel and then top it again with a layer of chocolate!  Yum, kinda like a homemade Twix candy bar, only better! 

Salted caramel is not traditional in Millionaire's shortbread but really adds something fantastic to the taste. You don't have to add the salt if you're trying to cut down on salt, or if it doesn't sound good to you.

This recipe makes a 9x9 pan, and about 16-20 squares, but it might be a good idea to cut them into smaller 1" pieces as they are so rich.  I am sure that they have a ton of calories, so when you make them, you really should have someone to feed them to, or take them to pronto!   I, for one, do not want to be left alone with these things! I think I'd better find a way to get rid of these goodies asap.

The recipe that inspired me to try it was a big fat (but tasty) failure!  The caramel was delicious but was too SOFT and made a big oozy mess. So back I went to the Internet to read recipes for Millionaire's Shortbread.  The second recipe I made, the caramel was too HARD but delicious... (almost sounds like a Goldilocks story, eh?).  The hard caramel was like toffee, and the recipe is a definite keeper.  It was like Macintosh Toffee from Canada or Thornton's Toffee which is from the UK, the kind you smack on the counter and it breaks into hard shards that turn into a chewy, tasty gob in your mouth.  Stay tuned to the blog, and I promise to post that recipe before too long.


Ingredients:

Shortbread:
1 3/4 cup flour
1/3 cup sugar
1/2 cup butter


Salted Caramel:
1/2 cup butter
1/2 cup packed light brown sugar
2 tablespoons light corn syrup
1/2 cup sweetened condensed milk
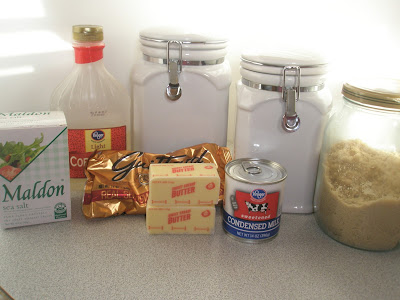
1-2 tsp crushed sea salt, I used Maldon's flaky sea salt

Chocolate Topping:
1 cup semisweet chocolate chips

Shortbread:
Preheat oven to 350.
In a 9x9 pan, line it with foil, or parchment paper.   You need this in order to get these cookies out of the pan.  DO NOT skip this step or your cookies will be more broken up when you have to pry them from the pan.

Shortbread is supposed to be FIRM, and to get firm shortbread you need to handle it!  Here's what you do, combine the soft butter with the sugar until well mixed, add the flour and knead the dough for at least 5-10 minutes with your hands.  The goal is too give your shortbread a "tough" sturdy texture that can stand up to all that caramel and chocolate.
Press into a pan in a packed and even layer.  Bake for 20 minutes at 325 degrees until just starting to brown.


In a 2 quart saucepan, combine 1/2 cup butter, brown sugar, corn syrup, and sweetened condensed milk. Bring to a boil. Continue to boil for 5 minutes.


Add sea salt, remove from heat and beat vigorously with a wooden spoon for about 3 minutes. Pour over baked crust (warm or cool). Cool until it begins to firm.

In a 2 cup microwave bowl, add 1 cup of chocolate chips and microwave for 30 second increments, stirring each time until it is melted.  Spread the chocolate over the cooling caramel and slightly tap the pan on the counter to smooth out any knife marks in the chocolate.  Let cool completely, which realistically takes about 4 hours. 

If you are in a hurry, you could try putting it in the fridge, but this can make your chocolate brittle so it doesn't cut in straight sided pieces.  Remove the cookies from the pan, using the foil edges and cut into small squares.  A large, long, sharp knife is best.  I use a cleaver.... it looks kind of scary, but it makes the cleanest cuts.

Other ideas:
  • Make the shortbread and caramel, cool completely and cut into long, narrow strips about the size of Twix candy bars and then dip into melted chocolate.
  • Add chopped pecans or walnuts into your caramel, or a layer of nuts between the shortbread and the caramel, top with chocolate as usual.
  • If you like the salted aspect, top the chocolate with a very light sprinkling of sea salt.
  • Use could use milk chocolate instead of semi-sweet, but it does make it a more sugary punch!
  • Chocolate shortbread (substitute cocoa powder for 1/4 cup of flour) and top with white chocolate. Wow....

Sunday, February 20, 2011

Mexican Chicken Posole Stew


Oh wow... this soup is amazing!

My friend Chris sent me this link for a recipe from Sunset Magazine "Speedy Chicken Posole".  He knows how much I like to cook and said that his friends from San Diego were raving about it.  Once I checked it out,  I remembered seeing this in the magazine, and I'm not sure why I didn't make it.  It could be that I think that I don't like hominy.... but I do, I do, now that is!  The original recipe calls for 2 cans of hominy and no corn, but I like corn and think it adds color and texture by mixing them. 

I also would have normally used the Poblano chilies that the original recipe called for and roasted them and diced them up... but I was TIRED, and was fresh out of Poblano chilies.  I felt that the canned chilies that I had in my pantry would be fine- - and they were!

The original recipe also called for chicken thighs diced up into 1" pieces and sauteed, which is what I did.  After we sat down to this dinner, with my husband in raptures of the yumminess of it all, we talked about how easy this would be with leftover cooked chicken, or a store bought roasted chicken.  Try it, I think it will work.  If you like this recipe, you should also try my Chicken Tortilla Soup which is my all time favorite soup and many of my friends too!

Ingredients:
1 can diced mild green chilies 
1 Tbsp.  garlic cloves
1  large onion
1 jalapeno
2 Tbsp parsley, or cilantro
1  14 1/2 oz. can white hominy
1 cup corn, fresh, frozen or canned
2 cups cooked chicken
       (rotisserie chicken or chicken breasts or thighs in 1" chunks & pan sauteed)
2  teaspoons dried Mexican oregano
1 tsp salt
2  tablespoons  olive oil
4  cups chicken broth (homemade, canned or chicken bouillon)
2- 3  tablespoons mild chili powder
Juice of one lime
1/4 cup chopped cilantro
Garnishes: sliced avocado, lime wedges, cilantro sprigs, and sour cream

If you are using fresh chicken, go ahead and saute the chunks in the stock pot in some olive oil until it is browned, about 5 minutes.  Do your veggies below in the same pot, after removing the chicken to a plate to add again after the veggies are cooked.

In a food processor, add the garlic, the jalapeno and the onion, cut into chunks. 


Pulse until the mixture is in rough chunks. 


Add to a stock pot over medium heat and saute in some olive oil until soft, about 3-5 minutes. Add the chili powder and the oregano and stock.

Add the chicken, the chicken stock, the corn and the hominy and simmer for about 10 minutes over medium heat. 


Add the can of diced chilies and the juice of one lime, and taste and add salt as needed.
Serve topped with thin slices of avocado, more chopped cilantro and extra lime to squeeze as desired.  It is also great with a dollop of sour cream on top!
Serves about 4.
What else would this technique work on???
You could easily use this technique on any kind of leftover meat, especially shredded pork or beef. I also think you could make this with vegetable broth and firm tofu and make the Vegetarians in your life quite happy too.

Tuesday, February 15, 2011

Salmon, Spinach & Garbonzo Beans baked in foil


Flipping through a new magazine the other day, I found a whole article on "heart healthy" fish recipes baked in parchment paper.  While I know as a cook that I should have parchment paper around... I rarely do, so I made packets out of foil instead. The only drawback is that you can't really see what is happening in the there, but believe me, it IS cooking beautifully.

I made this for the family after a fun day out at the aquarium and bumming around Seattle, and we returned home ready for a nice dinner. It came together quickly, and everyone loved it, even the one that doesn't really like fish! It was especially good served on the thin spaghetti noodles, even though I admit, I only added those for the photo shoot... it soaked up all the yummy juices and held together the spinach, garbanzos and salmon into one lip smacking bite.  Hmmmm, I am definitely making this again soon since I almost always have these ingredients on hand. I used the Costco frozen fillets, but any salmon would work cut into individual portions. 

I'd like to link to the original Martha Stewart recipe online, but after searching extensively, it looks that it is not out there yet. In this day and age, how can that even be???   If you are interested in the original, it's from the March 2011 MS Living magazine, I did change a couple things but it's close.


Ingredients:
4 salmon fillets
1 bunch of fresh parsley, roughly chopped
1 Tbsp minced garlic
3-4 Tbsp Olive Oil
1 tsp salt
1-2 tsp red pepper flakes
4 BIG handfuls fresh baby spinach
1 15oz. garbonzo beans, drained
Ground pepper
Sea Salt
1 lemon

In a blender, or food processor, make a simple mixture of the parsley, garlic and olive oil.  I must admit I didn't even chop the parsley, just ripped into smaller pieces and zoomed it up with the garlic, salt and olive oil.  You do want this mixture to be highly seasoned because it is flavoring your salmon fillets so I wouldn't skimp too much on the salt in this step.


Cut four sheets of foil in roughly 11x17 sheets.  Make a crease down the center of each sheet so you can see exactly which side you need to stay on... that is, if you want some tidy packets when you are done. 

Each foil sheet should have the following:
  •  a large handful of spinach
  •  topped with about 1/4 of the can of garbanzos
  •  top with a salmon fillet,
  • spread with the parsley pesto
  • Red pepper flakes (I added quite a few, and it was not too spicy!)
  • and a big squeeze of lemon
Crimp the sides of the packet like this:


Bake at 400 degrees for about 10-15 minutes. 
I used two baking sheets, two packets per each pan to make sure they didn't leak all over my oven! My salmon fillets were pretty thick so I baked for 15 minutes.  I checked at 10 minutes, and carefully (it is HOT & steamy) opened one of the packets and noted that it needed a bit more time.  I just recrimped the foil and threw it back in for another 5 minutes.

It is a bit tricky to get all this out of the packet because it's hot, juicy and you're trying to keep the fish intact!  Ideally it would seem you'd want your salmon sitting on a bed of spinach & garbanzos, but that is easier said than done.  Here's what I did to get the presentation above, With a spatula, carefully lift out the fillet, then with a pot holder, dump the rest of the contents out onto the plate and the pasta (or rice!), you can arrange it afterwards. 

Side Dish Inspirations
Since this main dish already has the protein, greens and legumes, it could stand on it's own for dinner, but I loved having a starch with it too
  • Thin spaghetti noodles
  • Rice
  • French bread
What else would this technique work on???
You could easily change the meat in this recipe, here's some ideas.
  • Any fish would work with this, Tilapia or Halibut.
  • Chicken breasts (pounded uniformly thin) would well with these flavors too, but would require a bit more cooking time.

Sunday, February 13, 2011

Jambalaya- Hot links, Chicken & Shrimp


I've been driving my husband crazy for a week... well, probably longer, but this one is food related!

I bought this huge bag of Louisiana Hot link sausages at Costco last week, and every time he opens the fridge, he says "when are you going to make something with these?". I bought them them for a group thing that I didn't end up needing them for, so now, I've got a lot of Hot Links to get through, luckily I have a bunch of ideas to use them up.

This is a great one pot recipe to do for a small dinner party, and it's very, very easy.  It tastes pretty authentic to me, but I am not a New Orleans native, so I will have to ask my buddy Frank. Authentic or not, it is a crowd pleaser!


Serves about 6

Ingredients:
2-3 Tbsp Olive oil
4 hot links/smoked sausage , sliced into 1/4-inch rounds
2 med onions, chopped
1 large bell pepper, chopped (I like yellow, orange or red peppers)
3 stalks celery, chopped
2 large boneless, skinless chicken breasts, cut into 1-inch pieces
2-3 Tbsp crushed garlic
1 Tbsp dried oregano
1/2- 1 Tbsp dried thyme leaf
4 large dried bay leaves
1 Tbsp black pepper
1/4- 1/3 cup Frank's Red Hot sauce, or to taste.
      If you use Tabasco, use less!
4 oz tomato paste (2/3 of a small can)
1 15oz. can of diced tomatoes, plus juice
2 1/4 cups chicken stock
1 1/2 cups long grain white rice
1 lb peeled, deveined & peeled shrimp

Preheat oven to 350°F and adjust your oven racks so that you can get your big pot in there.

In a 6-quart or 8-quart stock pot, (making sure to chose one that has a lid!) saute the onion until it's translucent,  then add the bell pepper and the celery.  Cook until they soften, about 5 minutes.

Add the sliced sausages and the chicken, stirring it until the chicken starts to look cooked, about another 5 minutes.  Don't worry about getting it fully cooked... you've got a lot more cooking to be done.  It will be fully cooked by the time you are done!


Reduce heat to medium-low, stir in garlic, oregano, thyme, bay leaves and black pepper, and stir 1-2 minutes. Add hot sauce, tomato paste and tomatoes. Stir to combine, and cover. Cook 8-10 minutes, stirring once or twice. Uncover, add chicken stock, and bring to the boil. Turn off heat, and stir in the rice.

Cover the pot, and place in the oven. Bake for 1 hour.

Stir in the raw shrimp about 5 minutes before it's done, re-cover and add back to the oven to finish cooking.  If it looks dry when you add the shrimp, you can add another 1/4 to 1/2 cup of chicken stock.

Let the mixture sit for about 5-6 minutes before you serve it.

This is an easy recipe to double for a big group, but you are going to need a big pan, or do it in two pans.  Make sure they fit into your oven first... just saying!

Side Dish Inspirations
This is a full meal on it’s own, you probably only need a salad and maybe some bread:
  • Green Salad
  • French bread
What else would this technique work on???
You could easily change the meat in this recipe, here's some ideas.
  • Substitute Ham for one of the ingredients, Chicken, Ham and prawns would be tasty and not as spicy.
  • If you don't have Seafood lovers in your family, just use Ham, Hot links and Chicken!

Friday, February 11, 2011

Chocolate Grand Marnier Pot du Creme


I'd like to share the easiest chocolate recipe ever... and I mean EVER!  This is perfect for any dinner party, but especially great for Valentines Day, which is, oh by the way, Monday! This is best served in SMALL portions, it is intensely rich.  I usually use small demitasse coffee cups, or these little mint julep cups that we've had in the family for a long time.  Each portion is about 1/4 cup or about 2 oz. You could put this in small martini glasses, or small ramekins if you don't have the little coffee cups. I made this last night for my writing group get-together.  They are the most fantastic and amazing women who were willing to be "quality control advisors".  
They oohed,  they aahed and scraped every bit out of their cups!  I would say it was a success.

This is a family recipe, and something that my Mom has been impressing people with for years.  She doesn't like to share it, but I have changed it a teeny, tiny bit. When we were kids, we used to eat these with a teeny, tiny demitasse coffee spoon. The goal was to be the last sister still eating their dessert while those around you were envying your self control in savoring your dessert.

Every time I stop and read a Pot du Creme recipe in a cookbook, or online, I am mind boggled to see how complicated they are!  What?  Why so hard?  This one is easy... one disclaimer though, it does include a raw egg that is "cooked" by the hot milk.  If you are worried about salmonella, and are one of those annoying people that never eats cookie dough, then this recipe is probably not for you! 

I made a double batch of the recipe below in my example pictures, so please note that if you follow this recipe as written below, you should get 5-6 small portions. I got almost 12 portions... which is waayyyyy too many to have in your fridge if you are home by yourself!


Ingredients:
Almost ¾ c. milk, ( have it slightly less than 3/4 cup)
1 egg
6 oz. real chocolate chips, or good chocolate cut into small pieces
2 tsp. Grand Marnier (Rum or Brandy works great too!)

Put the egg in your blender and whip it up. 


Add the chocolate chips, and blend it again.
Heat up your milk to about 180 degrees if you have an instant thermometer, or until small bubbles appear on the edges of the pan.  I used a Pyrex measuring cup and microwaved it for a couple of minutes.  While the egg/chocolate mixture is blending, add the hot milk into the mixture through the top small opening of your blender lid.  This will melt almost immediately. 

Add the liquor of your choice, or just vanilla if you prefer.
Add the mixture to small cups and put in the refrigerator for about 4-6 hours, or overnight.


I put all my small dishes into a larger pan to make it easy to move from counter to fridge, plus, you don't want anyone to knock these over in your fridge, yikes, what a mess that would make!


Serve with whipped cream and raspberries, if desired. I also think ALL chocolate desserts should be eaten with hot strong coffee AND a glass of good red wine! 

Happy Valentine's Day everyone!

Sunday, February 6, 2011

Vietnamese Spring Rolls


I usually start with a picture of my finished recipe... but I did something silly when taking pictures of this.  I photographed the "ugly" one with the "best" one... just to show you how much my roll/wrapping technique improved between the first one and the last one!  Oh well.... you get my point, you too will improve.  Don't be disheartened by your first one.

I remember the first time I had Vietnamese Spring Rolls, it was at a work fundraiser, and I thought that maybe the person making it just didn't add enough exciting ingredients.  I know now that they were traditional, but I'd like to have more flavors and crunch in my spring roll.  Here's my first attempt to make these fresh little salad rolls, adding more veggies and changing up the sauce.  Thinking ahead for next time, I might even pre-marinate the prawns for more flavor!

Ingredients:
2 ounces rice vermicelli noodles
12 rice paper wrappers
24 large cooked, halved shrimp (peeled and deveined)
OR
8 oz firm tofu, cut into long thin matchsticks.
1 1/3 tablespoons chopped fresh Thai basil
1 carrot, shredded or cut into thin matchsticks.
1/3 of an English cucumbers, cut into thin matchsticks
1 cup of bean sprouts
3 tablespoons chopped fresh mint leaves
3 tablespoons chopped fresh cilantro
2 leaves lettuce, thinly sliced

Directions
Bring a small amount of water to a boil in a large saucepan, or stock pot.  (You need something big enough to dip the rice paper wrappers into after the noodles are done cooking!)   Boil the rice vermicelli noodles for approximately 3 minutes or until al dente. Remove noodles with tongs and let drain, retaining the water in the pan. Using the leftover noodle water, quickly dip the rice paper wrappers in the warm water to soften.

Get your work area completely prepped with all your matchstick veggies and pre-sliced prawns.

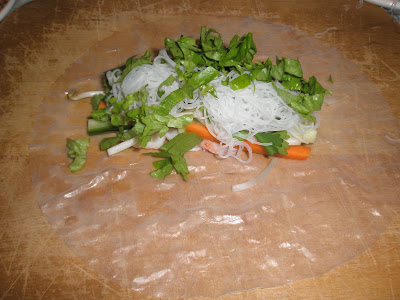
Using a large cutting board, Lay the wrapper flat and fill across the center with 2 shrimp halves (or tofu), cilantro, mint and basil, carrots, cucumbers, bean sprouts, vermicelli, and lettuce. Fold the wrapper inward on the sides and tightly roll. 


This can be kind of tricky… don’t be freaked out if your first couple are messy, they still taste great!   Repeat until all of your wrappers are filled.
These keep very well, but do tend to stick to each other, you might want to layer them between wax paper if you make a bunch ahead of time. These were great for lunches for 2 days after I made them.

Dipping Sauces:
My Favorite sauce-
3 Tbsp soy sauce
3 Tbsp rice wine vinegar
1-2 Tbsp chili garlic paste
1-2 drops of sesame oil.
Mix and serve with spring rolls.

This is the most typical dipping Sauce… but it is not my favorite. 
Ingredients:
4 teaspoons fish sauce
1/4 cup water
2 tablespoons fresh lime juice
1 clove garlic, minced
2 tablespoons white sugar

In a small bowl, mix altogether.  Serve with the fresh spring rolls.
                 

Thursday, February 3, 2011

Bacon Corn Chowder


I'm a big soup fan, and even though I posted my Pork and Chorizo Soup on Monday, I'm still thinking SOUP today.  It's so snowy nationwide with almost 2 feet in places, I just couldn't post the Vietnamese Spring Rolls that I had  planned.... seemed like we needed something more cozy.  Also, my husband needed some 'grub' for his group of friends who like to jam together last night, and I had all these ingredients ready to go!

I try to keep a bag of frozen cubed hash browns in the freezer, for the obvious hash browns, or a very quick soup or chowder.   I almost always have bacon in the fridge, or freezer, as I always buy the 4 pack at Costco.  If you didn't have frozen corn, you could use canned corn, or even creamed corn.


1/2 lb. bacon, thinly sliced into small strips
5-6  cups cubed potatoes (0r 32 oz. bag of frozen diced hash browns)
3 cups frozen corn, 1 cup reserved
1 1/2 onions, small dice
3-4 celery stalks, smaller inner ones with leaves are best, small dice
3 cups water, or broth (I used 2 tbsp of chicken base)
3 cups milk or cream, 1 cup reserved
Salt, going to take a tablespoon or two
Fresh ground pepper

Serving Condiments:
Grated cheddar cheese
sliced green onion
Crisp sliced bacon

Saute the bacon until browned, remove and drain the bacon, retaining 1-2 tbsp of bacon grease to saute the onions and celery.  Saute until they are soft, about 3-5 minutes.  Add the potatoes, and 2 cups of the corn.  Add 3 cups of water, or chicken broth.  I added about 2 Tbsp chicken base to my water to give it some great flavor.  Heat to a boil and simmer until the potatoes are tender, but not falling apart.  Meanwhile, add the remaining 1 cup of corn to your blender, with 1 cup of milk.  Blend until smooth and add to the soup when the potatoes are done.  Add the remaining cups of milk (or cream) and heat through.  If the soup is too thin for your liking, you could add 1/2 cup of instant potato flakes to thicken it up quickly. 

What else would this technique work on???
You could easily use this technique with:
  • Canned clams- just skip the corn (or even include it) and you've got a nice clam chowder.
  • Add Cooked chicken and make it Bacon, Chicken and Corn Chowder.
  • Substitute Ham for bacon, or add both!